This is the multi-page printable view of this section. Click here to print.
Documentation
- 1: Overview
- 2: Download
- 3: Setup
- 4: Update The Agent
- 5: Console
- 5.1: Profile
- 5.2: Plan Details
- 5.3: Reserved Domains
- 5.4: Agent
- 5.4.1: Agents
- 5.4.2: Agent Token
- 5.4.3: Authentication Providers
- 6:
- 7: Terms Of Service
1 - Overview
You don’t have to deal with public IP, DDNS, SSL certificates or opening ports on your router.
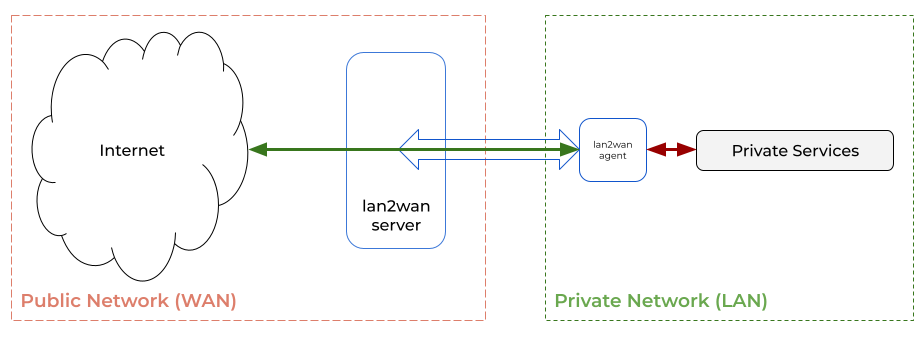
lan2wan service allows you to access your local services from the internet.
You can publish your service in a single command.
Example: publishing my local web application to the internet
$ lan2wan publish http://localhost:8080 --username hello --password my_secret

Local URL         	http://localhost:8080
Remote URL / HTTP 	http://xzmjg-106-220-244-187.free-tier.in-blr1.lan2wan.online
Remote URL / HTTPS	https://xzmjg-106-220-244-187.free-tier.in-blr1.lan2wan.online
Encrypted tunnel
When you publish your services, lan2wan agent creates an encrypted tunnel over the entire communication.Features
- Supports end-to-end encryption
- You will get a random domain name, or you can use your custom domain
- You can add additional authentications in front of your local services.
- You can manage your endpoint settings via lan2wan console
Supported endpoints
- http
- https
- file browser
- tcp (via websocket)
HTTPS Certificate Management
When you publish your local services, You should add certificates to allow your connection is secure and encrypted. Here are the options available to manage your certificates.
Note
All the time lan2wan agent and lan2wan server communication will be encrypted.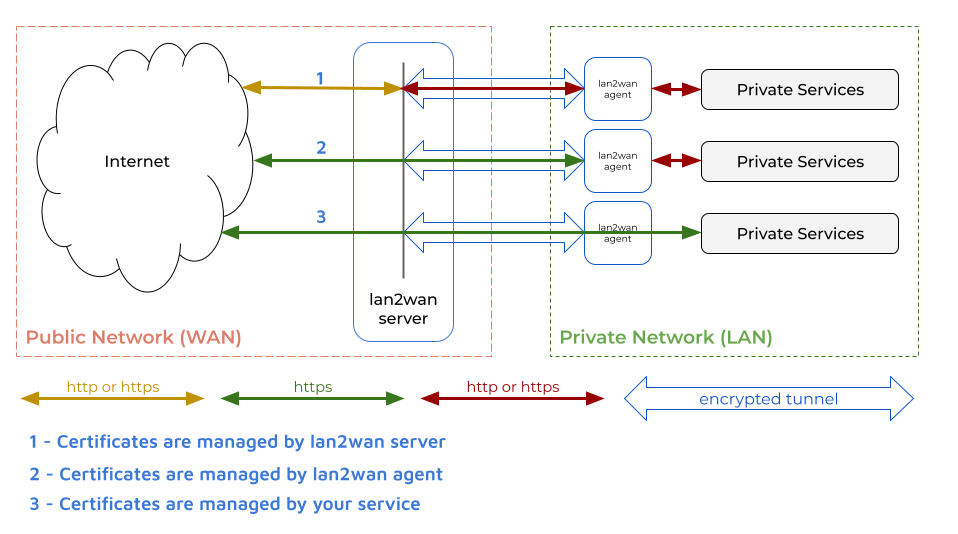
- Managed by lan2wan server
1 - Managed by lan2wan Agent (aka end-to-end encryption)
2 - Managed by your service (aka end-to-end encryption)
3
1. Managed by lan2wan server
In this mode certificate will be managed by lan2wan server.
Note
In this mode for user defined domains and native custom domains, Self-Signed certificate will be used.Letsencrypt certificates will be used only for the random domain generated at runtime.
2. Managed by lan2wan Agent (aka end-to-end encryption)
Also called as end-to-end encryption. In this mode certificate will be managed by lan2wan agent.
You can also provide your own certificate or lan2wan agent can get certificate from letsencrypt by default.
There is an option to specify your own ACME.
Downloaded certificates will be stored under ./certs directory in the agent location.
In addition to manage certificate also manages renewals automatically.
3. Managed by your service (aka end-to-end encryption)
Also called as end-to-end encryption. In this mode you service has to manage the certificates
Authentication Providers Not Supported
In this mode you can not use additional authentication feature.end-to-end encryption
Encrypts entire communication between your browser to your local instance.You can validate that there is no man-in-the-middle attack(MITM) happening by making sure that the certificate fingerprints matches with the local service certificate fingerprint.
2 - Download
Executable
lan2wan agent is available in executable binary format. You can download for you OS architecture.
- Linux x86_64
- Linux 386
- ARM64
- ARM
- Mac OS (AMD64)
- Mac OS (ARM64)
- Windows (64-bit)
- Windows (32-bit)
- Power PC 64 LE
- s390x
Docker Container Image
- quay.io/lan2wan
docker run --detach --name lan2wan-agent --volume $PWD/lan2wan.yaml:/app/lan2wan.yaml --restart unless-stopped quay.io/lan2wan/lan2wan:1.3.0
3 - Setup
Download the lan2wan agent and extract the tar/zip file.
Optionally you can place the lan2wan executable in your OS binary path.
Login
To get registered user benefits, you should have an account in lan2wan console server.
lan2wan login --email my@email.com --token my_token
Limitation
When you uselan2wan publish command without login, you will be continued as unregistered user and you will be under unregister user plan limitations. To avoid this limitations, you can register and login with your credentials.
Command Usage
lan2wan command utility has built in help documentation. Run lan2wan -h or lan2wan --help to get detailed usage options.
$ lan2wan --help
lan2wan is the agent of lan2wan console server (https://console.lan2wan.in)

Usage:
  lan2wan [command]

Available Commands:
  attach      Attaches your remote tcp port (via url) to the localhost
  completion  Generate the autocompletion script for the specified shell
  help        Help about any command
  info        Prints configured agent details
  list        List available resources
  login       Authenticate with lan2wan console server and keeps the credentials in the config file.
  logout      Log out from the server, removes the credentials from the config file
  plan        Prints your plan and balance details
  publish     Publishes a lan servers(http, https, file, tcp) into public url
  set         Set a resource value
  start       Starts the lan2wan agent, takes endpoint configuration details from the lan2wan console server
  update      Updates lan2wan agent to the latest version
  version     Prints agent version details
  zone        Prints the current zone

Flags:
  -c, --config string   config file (default is $HOME/.lan2wan/.lan2wan.yaml)
  -h, --help            help for lan2wan
  -o, --output string   output format. options: yaml, json, console (default "console")
      --pretty          JSON pretty print

Use "lan2wan [command] --help" for more information about a command.
Publish your local service
Two options available to publish your services
Publish Temporarily
This option will be useful when you want to publish your services for short time. Useful for developers to publish their application, webhooks, etc.,
Publish http service
# publish http service
$ lan2wan publish http://localhost:8080 --username hello --password my_secret

# publish files
$ lan2wan publish file:///tmp/my_share --username hello --password my_secret
Publish tcp port
Publishing tcp port works via websocket. It means you have to attach to a port on your remote host to access the tcp connection.
# publishes port localhost ssh via websocket
$ lan2wan publish tcp://127.0.0.1:22
Remote URL / HTTP http://random-domain.lan2wan.online
Remote URL / HTTPS https://random-domain.lan2wan.online

# command to attach your published tcp port on a remote host
# your tcp service will be accessible via 35913 port on a remote host
$ lan2wan attach https://random-domain.lan2wan.online
tcp service is listening on: 127.0.0.1:35913

# ssh into the localhost from remote location
$ ssh root@127.0.0.1 -p 35913
root@127.0.0.1's password:
Publish Permanently
Publish permanently is like configure once and forget :)
- You should your agent configuration in the console server
- on the command line login with agent name and your agent token from console server (
Agents >> Agent Token)lan2wan login --email my@email.com --token my_token --agent-name my_agent - Start the agent
lan2wan start
Thats it! Now you can update your changes on the lan2wan console server. Changes will be published automatically to your agent.
Docker container
You can start your agent as a docker container.
- create
lan2wan.yamlfile with your credentials as follows in your localhost,
agent_name: my_agent
email: my@email.com
token: my_token
- create
certsdirector in your localhost and start lan2wan docker
mkdir -p ./certs

docker run --name lan2wan-agent \
    --env TZ="Asia/Kolkata" \
    --volume ${PWD}/certs:/app/certs \
    --volume ${PWD}/lan2wan.yaml:/app/lan2wan.yaml \
    --restart unless-stopped \
    quay.io/lan2wan/lan2wan:1.3.0
4 - Update The Agent
To update the existing lan2wan agent executable just run la2wan update
5 - Console
lan2wan console is the place to manage your agent, endpoints, domains, authentication providers
Pre Requests
Google account
lan2wan console uses Google Authentication to login. You should have either Google account or a account linked with google.
Kindly report the issue if you face difficulty on login.
5.1 - Profile
Profile displays your email, zone, and allowed domain details.
Update Zone
You can update your preferred zone in profile page.

Changing Zone
It is recommended to update your zone at very first.5.2 - Plan Details
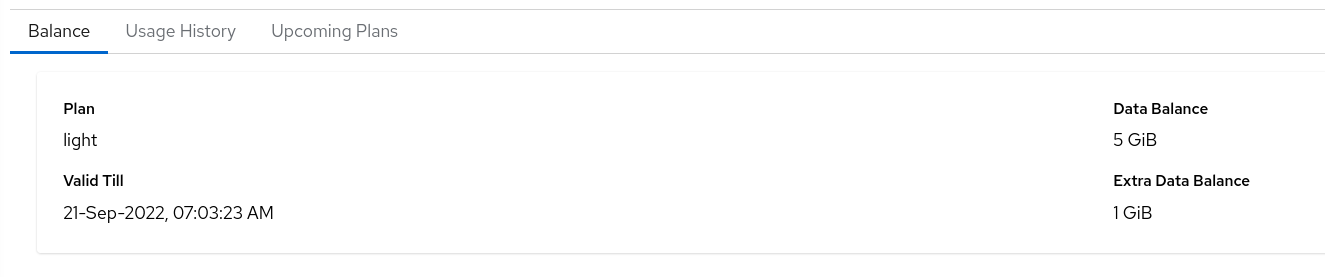
Displays your current plan, upcoming plans and last 7 days usage history.
5.3 - Reserved Domains
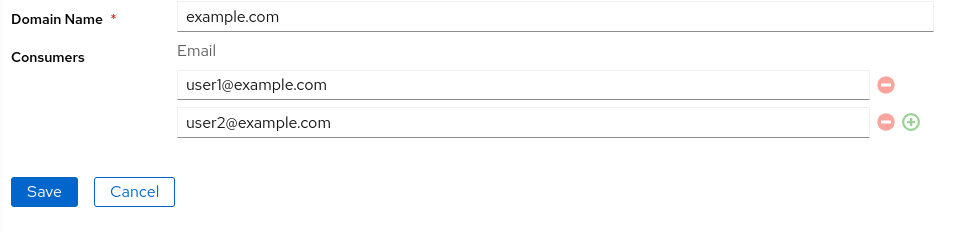
Your custom domains goes here. To add a domain click on Add and update domain name. Optionally you can share your domains with other user in lan2wan via Consumers field.
Generated domain
When you first time login into lan2wan console, a domain will be generated for you. You can not modify that domain.

5.4 - Agent
In this page you can update your agent and endpoint configurations.
5.4.1 - Agents
Navigate to: Agent >> Agents
You can add your endpoints and map with a public domain you can also configure headers, authentication for your endpoints.
Add an agent
To add new agent details, go to Agent >> Agents and click on Add

- Enter a name for the agent
- If you plan to use different end-to-end encryption certificate, select a provider. default provider letsencrypt.
- under the endpoint click on
Add an item - on the
Namefield add a name for your reference - click on
UpdateunderConfigurationand follow endpoint configuration
Endpoint Configuration
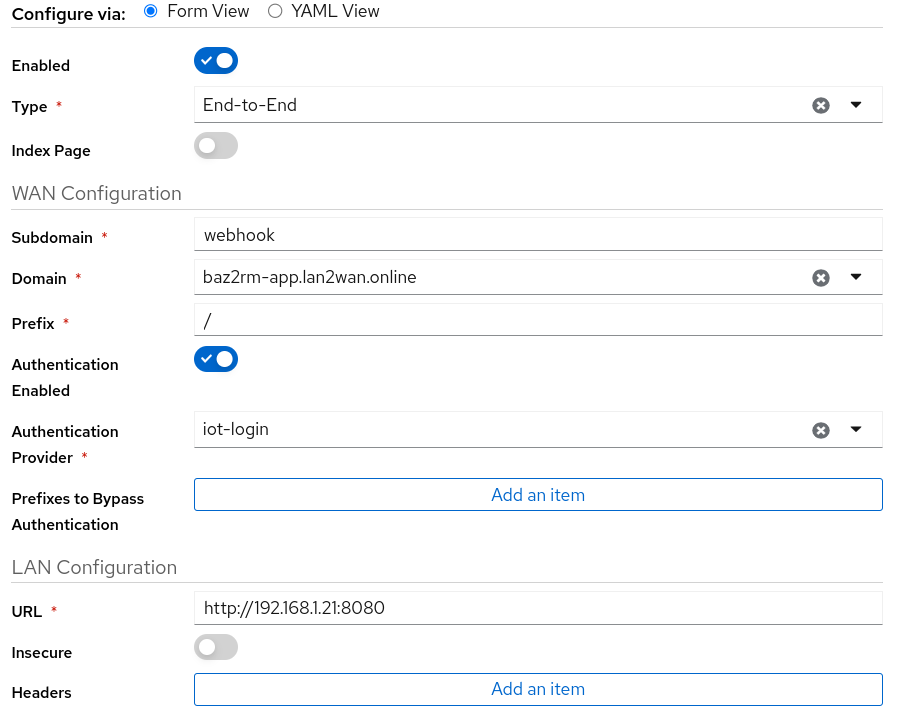
- Select a endpoint type. default
End-to-End - Add a subdomain to access this endpoint
- if you plan to add additional layer of security to your service, select a authentication provider
- On the LAN configuration enter your endpoint/service url
- Click on
Updateand click onSave
Now under the agents your newly created agent will be listed.
Custom Domain
If you use your own custom domain. you have to update WAN IP and domain name into your domain providers AAA record.To get WAN IP, go to agent details page and copy the
Domain WAN IP
localhost can not be used
In endpoint on LAN url, you can not uselocalhost, You have to use 127.0.0.1 in the place of localhost Example:
http://localhost:8080 should be as http://127.0.0.1:8080
5.4.2 - Agent Token
Navigate to: Agent >> Agent Token
To connect your agent to the lan2wan server, you need a agent name, token and email.
Also you can regenerate your agent token on this page.
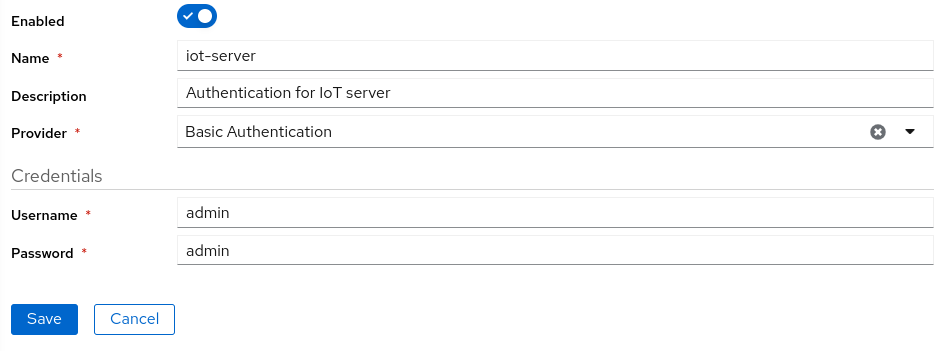
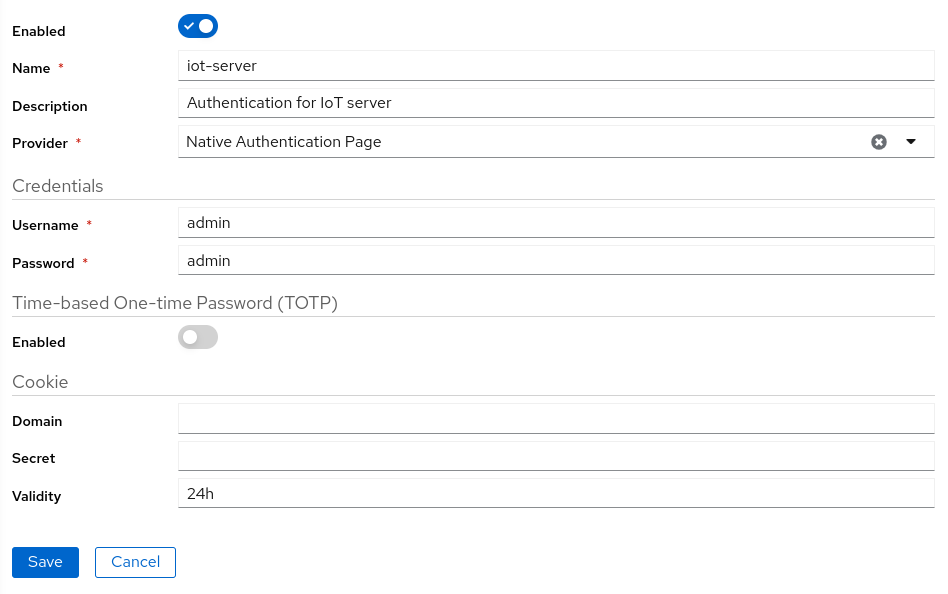
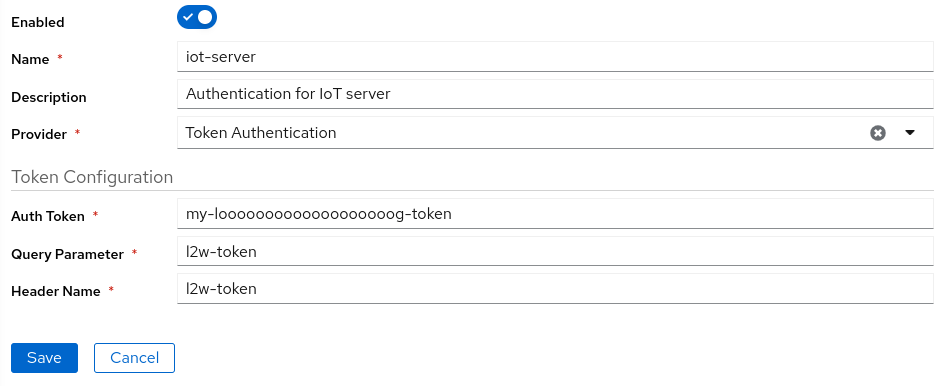
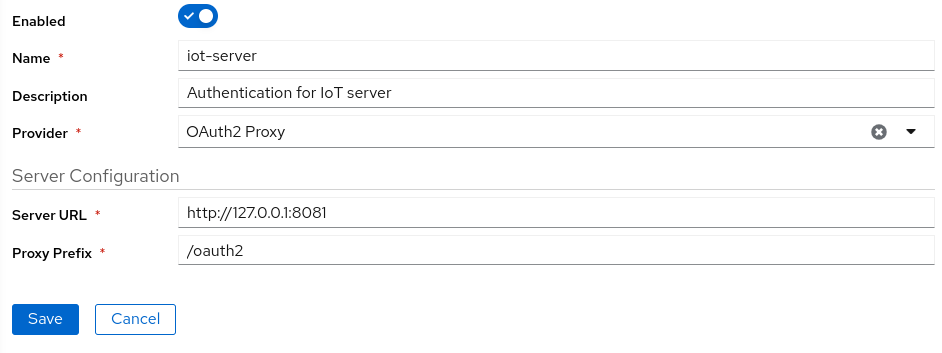
5.4.3 - Authentication Providers
Navigate to: Agent >> Authentication Providers
Authentication providers gives additional security to your endpoint. On a successful authentication allows access to your local endpoint. Different type of authentication supports are available.
- Basic Authentication
- Native Authentication Page
- Token Authentication
- OAuth2 Proxy
To add a authentication provider, Navigate to authentication provide page and click on Add
Basic Authentication
When you access your endpoint with a basic authentication, you will get a authentication popup on your browser.
Native Authentication Page
When you access your endpoint with a Native authentication page, you will be redirected to a login page. on successful authentication you will be landed into your endpoint.
Token Authentication
You have to include the generated token on your url as a header or query parameter.
OAuth2 Proxy
When you access your endpoint with OAuth2 proxy, you will be redirected to OAuth2 proxy login page. As a pre request you should have configured oauth2 proxy
6 -
Report Issues
If you face a difficulty, You can report your issue in GitHub Repository
Issue tracker: https://github.com/lan2wan/lan2wan
Support
TBD
7 - Terms Of Service
Last updated: June 11, 2022
TBD